Creating a New Branch
Creating a new branch is essential when working on a new feature or fixing a bug.
It helps keep your work organized and ensures the main branch remains stable.
Follow the steps below to create a new branch.
Steps to Create a Branch
Open the branch dropdown menu
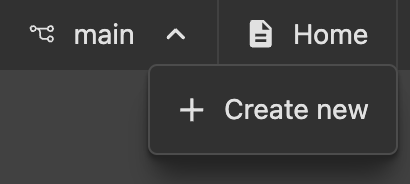
Select "Create new"
Click on the "Create new" option from the dropdown menu.
Name your branch
Provide a clear and descriptive name for your branch. Use names that reflect the purpose of the branch, such asstaging,feature/posts-rendering, orbugfix/login-issue.Click "Create"
Confirm your action by clicking the "Create" button.
Once created, your new branch will appear in the branch list and will automatically be set as the active branch.
Best Practices for Naming Branches
- Use lowercase letters and hyphens (
-) to separate words (e.g.,feature/add-user-authentication). - Include a prefix to indicate the type of work, such as
feature/,bugfix/, orhotfix/. - Keep names concise but descriptive.
Important:
Branches can only be created from the default main branch.
By following these steps and best practices, you can effectively manage your workflow and collaborate with your team.