Intro to the element events
Element events are triggers that work with the interactions that the your user performs on your website, such as clicking, hovering on an element, entering a value in an input field or submitting a form, etc. Wized allows you to listen to these events and create action flows to respond to them.
Note
Element events must be linked to an element that contains the Wized attribute. For events not linked to a specific element, use Global events instead.
Setting up an event
1. Select the element
In the Wized elements panel, click on the element. 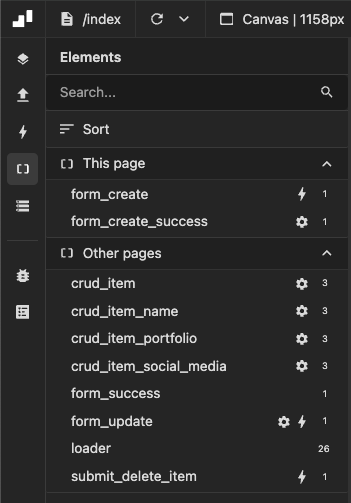
2. Go to events section
In the right panel, click on the lightning icon. 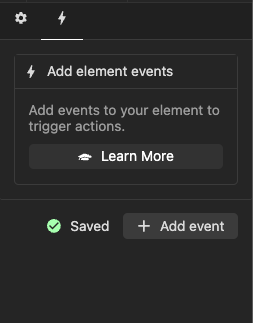
3. Choose the event
use the dropdown menu to select the event you want to listen to. You can choose from a wide variety of standard JavaScript events, such as click, submit, change, input, focus, blur, keydown, etc. Check the full list. 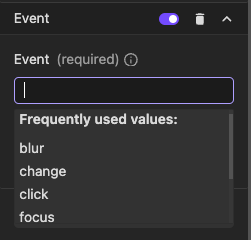
4. Configure event options (optional)
After selecting your event, you can configure additional options to control how the event behaves:
Prevent default
Prevents the default browser behavior for the event. For example, when applied to a form submit event, it prevents the page from reloading.
See Event.preventDefault() for more information.
Reset form (submit events only)
When enabled on a submit event, automatically resets all form fields to their initial values after the form is submitted.
Conditional
Allows you to define a condition that must be true for the event actions to execute. The condition is written as a JavaScript expression that returns a boolean value.
Example: Only execute actions if a variable has a specific value:
return v.isLoggedIn === true;You have access to:
e- The event object (e.g.,e.pageX,e.target)t- The target element node
Strategy
Choose a strategy to control how often the event handler executes:
Immediate (default) - Executes the event handler immediately every time the event is triggered, without any delay.
Debounce - Delays the execution of the event handler until after a specified delay has passed since the last time the event was triggered. This is useful for scenarios like search inputs where you want to wait until the user stops typing before making an API request.
Throttle - Ensures the event handler is executed at most once in a specified time interval, regardless of how many times the event is triggered. This is useful for events that fire frequently, like
scrollorresize, where you want to limit how often your code runs.
Delay (ms)
When using Debounce or Throttle strategies, specify the delay in milliseconds. The default value is 300ms.
Example use cases:
- Search input with debounce: Wait 500ms after the user stops typing before searching
- Scroll event with throttle: Update scroll position indicator at most once every 100ms
- Resize event with throttle: Recalculate layout at most once every 250ms
5. Select the action
Choose the action you want Wized to execute when the event is triggered. You can create complex flows with more than one action in the same event.
You can rearrange actions by dragging and dropping them. You can also enable or disable them using the toggle, controlling whether they execute when the event occurs.
Order matters
Keep in mind that the actions are executed in the order in which they are in the event.
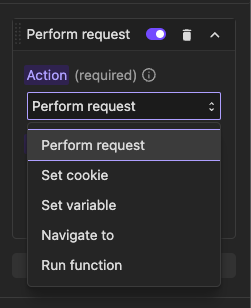
6. Set up the action
Depending on the action you have chosen, specific parameters will appear that you must set.
Most common events
To use any of these events, just type the name of the event in the dropdown, even if it does not appear in the dropdown options.
Mouse events
click → Triggered when an element is clicked
dblclick → Triggered when an element is double-clicked
mouseenter / mouseleave → Triggered when the mouse enters or leaves an element
mouseover / mouseout → Similar to
mouseenter/mouseleavebut bubbles
Keyboard events
keydown → Triggered when a key is pressed
keyup → Triggered when a key is released
Form events
submit → Triggered when a form is submitted
input → Triggered when a user types in an input field
change → Triggered when the value of an input/select changes
Window events
load → Triggered when the page fully loads
resize → Triggered when the window is resized
scroll → Triggered when the user scrolls
Touch events (Mobile)
touchstart → Triggered when a user touches the screen
touchmove → Triggered when a user moves their finger on the screen
touchend → Triggered when a user lifts their finger
Actions
Actions are tasks that Wized performs in response to a user-triggered event. When a user interacts with an element (e.g., clicks a button, types in an input field, hovers over an element), an event is fired, and one or more actions can be executed.
Actions can be chained together, meaning you can execute multiple actions in sequence. Additionally, each action can have optional conditions, allowing you to define rules that determine whether an action should be executed.
Note
- This events focuses on actions triggered by user interaction events (e.g., clicking, input changes, form submissions). It does not cover global events like "on page load."
- Actions are executed in sequence, one action is executed only when the previous one has been completed.
Available actions
Set Cookie
Stores or updates a cookie value in the user's browser. useful for remembering user preferences or tracking interactions.
Example use cases:
- Save a user’s theme preference when they toggle between light and dark mode.
- Store a user’s preferred language when they select it from a dropdown.
Example:
Event: click on a toggle button
Action: Store the selected theme in a cookie
Note
Make sure you've created at least one cookie, as you'll need to select the cookie you want to update from the dropdown, where all created cookies will be listed
Set variable
Updates the value of a variable in Wized. This is useful for temporarily storing user selections or form inputs.
Example use cases:
- Store the selected product ID when a user clicks on a product.
- Track the number of times a user clicks a button.
Example:
Event: click on a product card
Action: Save the selected product ID in a variable
Note
Make sure you've created at least one variable, as you'll need to select the variable you want to update from the dropdown, where all created variables will be listed
Custom function
Executes a JavaScript function to perform advanced operations, such as formatting data or interacting with other scripts.
Example use cases:
- Format user input before displaying it.
- Validate a form field before allowing submission.
Example:
Event: input in a text field
Action: Format user input to capitalize the first letter
Note
Custom code is a powerful tool, but keep in mind that Wized doesn’t validate it. Make sure your code is well-structured to avoid unexpected behavior.
Perform a request
Sends an HTTP request to an API to fetch or send data. This is useful for interacting with external services.
Example use cases:
- Fetch product details when a user selects an item from a list.
- Submit form data when a user clicks the "Submit" button.
Example:
Event: change in a dropdown
Action: Fetch product details from an API
Note
Make sure you've created at least one request, as you'll need to select the request you want to perform from the dropdown.
Action flows (chaining actions)
One of the most powerful features of Wized is the ability to chain multiple actions into a sequence. This allows you to create dynamic, complex workflows that execute step by step in response to a single user interaction.
Why use action flows?
- Sequential execution → Actions run in order, ensuring logical dependencies.
- Conditional logic → You can define conditions that determine whether an action should execute or not.
- Flexible customization → Actions can be mixed and matched to fit any interaction scenario.
Example Product selection flow
Event:
When a user clicks on a product card, the flow:
- Stores the selected product ID in a variable.
- Fetches product details via an API request.
- Set a variable (using a condition if stock > 1).
- If in stock, updates the UI with a success message
Disabling events and actions
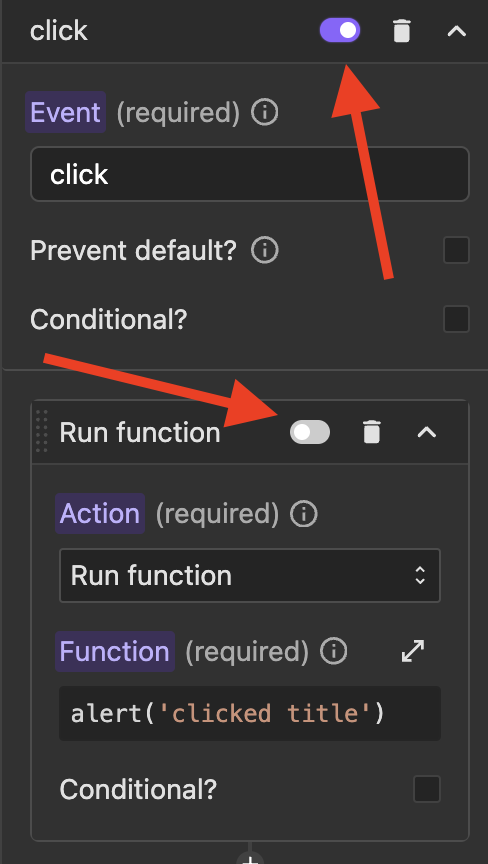
To disable temporarily element events and actions without deleting them you can use the disable switch in header. You can use this feature to pause certain functionalities and re-enable them later as needed.
