Forms
Forms in Wized allow you to collect and process user input efficiently. They work by grouping multiple input fields into an object, making it easier to handle data and submit it through requests.
Note
Make sure to read and understand the differences between using inputs and forms before choosing one. Avoid using both for the same elements, as they behave differently.
How do forms work?
Wized automatically detects and structures native Webflow forms without requiring complex setups. Here’s how:
1. Create a form in Webflow
- Add a Webflow form element to your page.
- Include the necessary input fields (
text,email,password, etc.). - Assign a unique name to each input field in Webflow’s settings. This name will be used in Wized.

Note
You can also use embedded custom elements
2. Wized attribute
- Do not add Wized attributes to individual inputs.
- Add the Wized attribute only to the
formelement. - Wized will automatically recognize the form and all its inputs.

3. How Wized structures form data
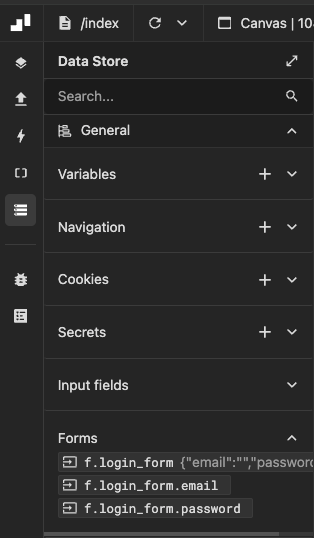
Once detected, the form will appear in the data store under the “Forms” section:
- The form itself is converted into an object.
- Each input field inside the form becomes a property of this object.
- The input names set in Webflow are used as the keys of the object.

Note
At first, the form values will be empty since Wized only fills them after the form is submitted.
Accessing form values
Unlike inputs (which update in real time), form values are only available after submission. To access a value from a submitted form, use:
return f.loginForm.email; // Retrieves the email input valueIf the form hasn’t been submitted, this will return empty.
Submitting a form and sending data via API
Note
Enabling bot protection in webflow disables the submit button for a few seconds. Disabling the submit button prevents the submit event from occurring.
To process and send form data via an API request, follow these steps:
- Select the form element in Wized.
- Add an On Submit event.
- Enable Prevent Default to stop Webflow’s default form submission.
- Use a perform request action to send the form data.
Example sending a login request:
Imagine a login form where users enter their email and password. To send this data to an API, follow these steps:
- Create a Request in Wized (e.g.,
login). - In the Body section, add the required
key-valuepairs (e.g.,email,password). - Set the values using the Function Editor:
For email:
return f.loginForm.email;For password:
return f.loginForm.password;This ensures that the submitted form values are dynamically passed to the API request.
Key takeaways
✔ Wized automatically recognizes Webflow forms (no need to manually create forms in Wized).
✔ Form inputs are grouped into an object for easy data handling.
✔ Form values are only accessible after submission.
✔ Forms must have an "On Submit" event with "Prevent default" to send data to an API instead of Webflow.
Inputs vs forms
When working with Wized, it is important to understand the difference between forms and inputs to use them correctly and avoid common mistakes.
Forms: Structured data collection
Forms are used to group multiple input fields into a single structure, making data management easier. They are particularly useful when you need to collect structured information, such as login credentials or contact details.
Key characteristics of forms
- Data grouping: Forms bundle multiple input fields together, making it easier to send structured data.
- Accessibility: Users can submit forms by pressing the
Enterkey. - Native Webflow validations: Forms support Webflow’s built-in validation, such as required fields, email formatting, and number restrictions.
- Delayed value access: The values inside a form are only accessible after submission, not in real time.
- Recommended use: Forms are best used when collecting structured user data that needs to be validated before submission.
Inputs: Real-time value detection
Inputs allow you to collect and process user input on an individual basis, making them useful when you need real-time value updates. Unlike forms, inputs do not require submission to access their values.
Key characteristics of inputs
- Independent data handling: Inputs work individually rather than as part of a structured form.
- No Enter key submission: Unlike forms, pressing
Enterdoes not trigger submission. - Real-time value access: Input values can be accessed and modified as the user types, enabling instant feedback.
- Recommended use: Inputs are ideal when you need to process user input dynamically, such as formatting numbers, validating age restrictions, or enabling/disabling elements based on input values.
Example use case
A currency input field where a user enters a number, and it is automatically formatted as a currency value ($1,234.56) in real time.
Choosing between inputs and forms
| Feature | Forms | Inputs |
|---|---|---|
| Data grouping | Groups multiple inputs into a single structure | Each input is handled individually |
| Accessibility | Can be submitted by pressing Enter | Cannot be submitted with Enter, requires a separate button |
| Validation | Uses Webflow’s native validations (required fields, email format, numbers, etc.) | Requires custom validation via function editor |
| Real-time value access | ❌ Values are only accessible after form submission | ✅ Values can be accessed in real time |
| Best use case | Collecting structured user data that requires validation before submission (e.g., login, contact forms) | Running real-time logic based on user input (e.g., formatting numbers, validating age dynamically) |