Captcha Protection
Overview
Captcha protection helps prevent automated abuse and bot attacks on your Supabase authentication endpoints.
Enabling Captcha in Supabase
Prerequisites
- A Supabase project
- Access to your Supabase project's dashboard
Steps
Enable Captcha Protection
- Go to your Supabase Dashboard
- Select your project
- Navigate to the Auth section
- Under Settings > Authentication > Bot and Abuse Protection > Enable CAPTCHA protection toggle
Choose Your Captcha Provider
Supabase supports multiple providers:
- hCaptcha
- Cloudflare Turnstile
Configure Your Provider
For Cloudflare Turnstile:
- Sign up at Cloudflare
- Navigate to Turnstile in your dashboard
- Create a new widget
- Copy your Site Key
For extra settings you can access the Cloudflare Turnstile documentation
For hCaptcha:
- Sign up at hCaptcha.com
- Create a new site
- Copy your Site Key
For more information you can access the hCaptcha documentation
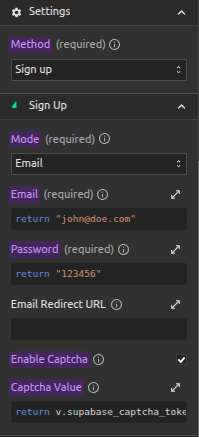
Set Up In Wized
- Access your Wized project from app.wized.com
- Add an appropriately named variable; in this case it will be
supabase_captcha_token - Configure your request to enable captcha and in the value use the Wized variable
Set Up In Webflow
For Cloudflare Turnstile:
In the
<head>section of the page, add the Turnstile script:javascript<script src="https://challenges.cloudflare.com/turnstile/v0/api.js" async defer></script>Add the widget element where the captcha will be placed, this can be a normal section element within a form
html<div id="cf-turnstile"></div>Add the script to render the widget and assign a callback to get the captcha token and assign it to a Wized variable
javascriptconst widgetId = turnstile.render("#cf-turnstile", { sitekey: "<YOUR-SITE-KEY>", callback: function (token) { Wized.data.v.supabase_captcha_token = token; }, });
For more information on the client-side setup you can access the full Cloudflare client-side setup documentation
For hCaptcha:
In the
<head>section of the page, add the hCaptcha script:javascript<script src="https://js.hcaptcha.com/1/api.js" async defer></script>Add the widget element where the captcha will be placed, this can be a normal section element within a form
html<div class="h-captcha" data-sitekey="YOUR_SITE_KEY" data-callback="onHcaptchaSuccess"></div>NOTE:
The
data-sitekeyattribute should have the value of the site key copied from earlier Thedata-callbackattribute is the name of the function executed when the response from hCaptcha is successfulAdd the script to render the widget and assign a callback to assign the captcha token value to the Wized variable specified earlier
javascriptfunction onHcaptchaSuccess(token) { Wized.data.v.supabase_captcha_token = token; }